Friday, February 27, 2009

Font Love: Feel Script Font

Seeing that I work with wedding projects, I have a huge selection of fonts for my clients to choose from. But I had run into this newer font (from a bride) and I had to share it with everyone. Feel Script is such a GORGEOUS font. It's whimsical, pretty, and elegant, All in one. It's very similar to another font, Mahogony BT, which I do have, but Feel Script is a newer version, and is only available for download at Veer. Unfortunately, it's priced at $99.00, and I haven't taken the plunge to purchase it at that price since I already have a similar font. But, the more I look at it, the more I'm tempted to just add it to my collection just for my own personal use.

But in case anyone is looking for something a little different (particularly DIY Brides), check this font out. With a font as pretty as this, you won't need too many embellishments on your DIY projects.

Thursday, February 26, 2009

Cristina & Daniel

Here's the monogram setting the tone for Cristina's package... And the digital proof of her Menus. I created the pdf file for her to make the DIY menus. I suggest doing two layers of cardstock for the DIY menus. Maybe choose one textured cardstock, and one metallic. Since her colors are eggplant/dark purple and gold, she can use some cool gold metallic cardstock as the accent piece behind the menu. This digital mockup below is actually meant to represent a menu that is 6X6 or 5x5 overall. But Cristina opted for a 5X7 menu, so the file I created was 4X6. That way, the gold layer could be cut at 4.5" X 5.5", and the purple (base) layer could be cut at 5X7 inches.
I will be physically assembling her table numbers, so stay tuned for those results!

Candelaria Formal Event: Table Numbers & Programs

The Candelaria-Zambales Association came to me looking for table numbers and programs for their formal "Induction Ball." Because it takes place in February, they had chosen Red and White as their color theme. I actually had a lot of help from my crew (thanks Mom & Dad!) in gluing these together since it's been quite a busy month for GE Designs.

Here is the monogram I created to set the theme and tone of their paper products... I used the concept of initial monograms for weddings, with the Z in the middle. I just thought it would look cool with the group's initials in the "twined" look. So they went for it...


Here are a few shots of the table numbers. They went with themed table cards. Because there isn't assigned seating for their guests, they thought it would be nice to name each table after the names of their little community subdivisions in the Philippines. Since they will have a buffet, they want to be able to call out the names of their little communities instead of traditional numbers. Plus, it's a good way for people to remember their roots from their families' home town of Candelaria in the Philippines.


And here are a couple shots of their programs. These are booklets with 1 page insert, allowing for 4 printable pages.

Wednesday, February 25, 2009

Kristi and Shaun

Here are Kristi's monograms. Thanks Kristi!


From Etsy feedback: The most creative and amazing monograms! So easy to pick and choose! My wedding theme is complete!

Tuesday, February 24, 2009

Connie's Baby Shower

Marjorie is co-hosting a baby shower for her friend Connie, and asked for a few table numbers for the event. Because their invitations had baby carriages as a theme, I found a baby carriage graphic to use on the table numbers, and used little tiny rhinestones to embellish it a little. The color theme is chocolate, light pink and celadon (ribbon).


Monday, February 23, 2009

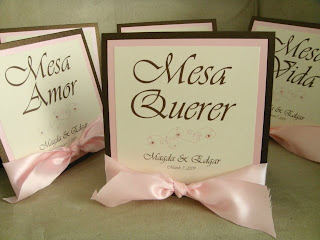
Magda & Edgar: Table Numbers

I love the names Magda used for her table numbers. Mesa Querer, Mesa Amor, Mesa Vida, Mesa Fe, and Mesa Carino.


Wednesday, February 18, 2009

Stefanie & Colin

Here is a monogram that I created for Stefanie to use her projects. We are also going to work together on a DIY digital file for her table numbers, which has a great new theme... Stay tuned!

Rochelle and Andre


Erin & Dwight - Reserved Signs

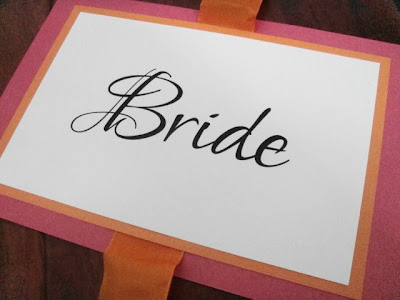
Here are a couple matching reserved signs for the bride and groom at their reception table. Erin will be using white folding chairs, which is why I attached 1 yard of 1.5 inch ribbon vertically on the signs. Brides may choose to attach the ribbon themselves by inserting slots onto the sign in any way they want. There are different ways to hang these reserved signs. You may hole-punch them at the top corners or attach the ribbon from the sides, horizontally. Depends on the type of chairs you will be hanging them on.

These signs measure 6 inches by 10 inches. They can range in size, depending on the chair types.

Monday, February 16, 2009

Erin & Dwight - Menus and Seating Chart

I had created Erin's table numbers (football themed) months ago, but now that her wedding's coming up at the end of this month, I am ready to ship out her menus and her reserved signs. The menus are going to be slightly slightly narrower than the table numbers, and will stand on their own, tent-style. They are made to match her Table Numbers in 3 colors (orange, Pink & Green).

A quick note about my tent-style products. Although you can't tell from the pictures, I do have a reinforcement piece inside these cards so that they do not fall flat on the tables. If you just fold a piece of cardstock, it will fall down on its own. And to keep my tent cards a good size, I've created a reinforcement piece to prevent that. They are small, but sturdy, and practically invisible. No need for my clients to assemble or glue anything. They're ready to stand on their own right away.


And in lieu of placecards, Erin will be going with the Seating Chart. I've created the pdf file for her to print out at Kinkos to place in a 24 X 36 inch poster frame, so her guests may easily find their table assignments.

Kelly and Daniel

I had made a few monograms for Kelly's wedding in the past, but she came back to me looking for more!


Here is Kelly's Save the Date digital file. She will be printing this on postcard sized cardstock at home.

Monica & Derrick

Here's a monogram that will be used on Monica's dance floor!

Thursday, February 12, 2009

Table Numbers - The Process

I'm still sitting in my hotel room, and I couldn't really sleep (even though I have to get an early start tomorrow), so I thought I'd set up this post to lull me to sleep. It's been a long and busy week (work-wise), but will be back home tomorrow, and ready to reopen the shop! I can't wait to get back to designing creations for my customers. Thanks for being so patient! I love my clients. =)

Here's a post that I've been meaning to share for a while....

My Table Numbers are my biggest wedding item in my shop. It's my baby, since it was my first wedding item I listed. I've gotten a lot of questions on how the whole order process goes, so I thought I'd share that process, just in case any prospective brides want to know. By the way, this process also applies to other wedding paper decor (programs, placecards, menus)....

1. Purchase the item in my shop for $10. This serves as the deposit to get the design process going. I do not create digital proofs until this initial step is done.

2. Proof Approval Process: Based on all the information sent to me (names, colors, photos), I create "digital proofs" or "mockups" of how I envision the end product to look. I will work with you until you absolutely love the design. Here is an example:

3. Payment of balance: Once you approve the digital proof, I will invoice you through PayPal, the remaining balance of the order, so I may print and assemble the Table Numbers, and possibly order the materials if needed. Assembly can take anywhere from 1 week to 3 weeks, depending on availability of materials (I may have to special order certain colors).

4. Finished product is shipped. I use USPS Priority with Delivery Confirmations, unless you prefer another way. I've had a buyer use her DHL account to ship, so shipping is flexible. I prefer to do it this way over First Class to ensure delivery. USPS Priority generally takes approximately 2-3 days.

5. You get to enjoy your finished product! And get ready for the oooohs and aaaaaaaahs from your guests at the reception! =)

Sunday, February 8, 2009

Closing Shop, but Happy Valentines Day!

I'm on a little vacation starting tomorrow, but I'll be back this Valentines Day weekend! Here's my last post till I get back. I was able to mail the rest of my Valentines Day cards out yesterday, so everyone should get their cards in time for Saturday. Happy Valentines Week to all!